


FydeOS is a cloud-based operating system aimed at the Chinese market. It is based on the cloud model of Chromium OS. Because FydeOS is browser-based, it's ideal for devices that don't have much power, This type of operating system mainly uses cloud applications, so it does not put too much pressure on the device it runs on.
Numerous reasons can cause Chromebook not connecting to wifi problems on a Chromebook laptop. The reason could be as simple as that wifi is not turn on of your Chromebook or something which is a little bit technical. You do not need to worry, most of these issues can be fixed by yourself through this step by step guide. Read this blog to troubleshoot Chromebook not connecting to wifi issue. If you are facing this problem with any brand of Chromebook like Google Chromebook, Acer Chromebook, HP Chromebook, Samsung Chromebook, Lenovo Chromebook, Asus Chromebook, Dell Chromebook, etc. you will be able to fix it along with problems mentioned below if your Chromebook.
Fix WIFI on FydeOS 13
Step 1: Select the language and the Keyboard language then click on OK.

Step 2: Choose English (United States) and then click Get started.

Step 3: Connect to the Internet using an Ethernet cable or Wi-Fi.

Step 4: In FydeOS end user license agreement interface click on Accept and Continue.

Step 5: In Privacy statement, click on Accept and Continue.

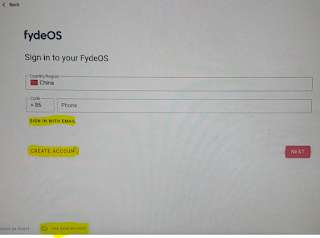
Step 6: You can create account or Sign in with your FydeOS account or select browse as a guest or use local account.
Step 7: You can proceed to the next step by pressing I prefer Google and click Next.

Step 8: Choose Set up this device for work or personal use and click Next.

Step 9: Sign in using the your Google account.

Step 10: You are all set, click on Get started.

Step 11: Open FydeOS Settings App from the list of applications.


Step 13: In WIFI Settings change the wifi driver switch to WL or to BCM.


VIDEO TUTORIAL - INSTALLATION GUIDE
DOWNLOAD FILES
Click on below button to start
We hope you enjoy my Website content as much as we enjoy offering them to you. If you have any questions or comments, please don't hesitate to let comment below.
Click on below button to start
NO-File-Required
DISCLAIMER
All videos on my Website and YouTube channel are for Educational purpose only to help people Fix errors and download and install software... for free. Anyone using these videos for any illegal or unlawful purpose will be solely responsible for his/her activity.
All videos on my Website and YouTube channel are for Educational purpose only to help people Fix errors and download and install software... for free. Anyone using these videos for any illegal or unlawful purpose will be solely responsible for his/her activity.


Nonsense, how do I connect to the internet on step 3 when it doesn't work. Fools.
ReplyDelete