After the program successfully writes a bootable Linux USB drive, the drive no longer appears correctly in Windows. That’s because a bootable USB contains certain drive partitions with filesystem types that are not visible to the Windows operating system.
This post describes the methods to repair or restore Flash Drive which appears to be damaged or corrupt after using with flashing tools such as Rufus, Balena Etcher, Startup Disk Creator, Fedora Media Writer, Windows Media Creator Tool, etc.. Sometimes when you make a bootable flash drive, the flash drive is rendered unusable due to reduced capacity.
Relax! Actually such tools do not damage Flash Drives. Capacity of the Flash Drive is reduced because Flashing tools create new partitions and un-allocate extra space. Also, on windows, Linux File System is not accessible, thus, only the bootable partition of Flash Drive of few MegaBytes (~ 2 MB) capacity is visible.
you can scan and repair your flash drive using your computer's built-in repair utility. If your drive isn't working because of an improper formatting or corrupted data, you can reformat your drive but keep in mind that reformatting your USB flash drive will erase all files on it.
When a flashing tool is installed and used to create a Bootable drive for Operating Systems the ISO image is flashed in “DD” mode. I another case, ‘dd’ command is used in Linux terminal to create bootable media from ISO files in command line mode. In both cases, the capacity of the flash drive which is required for operating system files is only used and it is made bootable. The remaining capacity of the flash drive is left as un-allocated space on the flash drive. After flashing, the flash drive is successfully made bootable and subsequently used to install Operating Systems on computers.
HOW TO RECOVER A USB DRIVE OR SD CARD USING CMD (COMMAND PROMPT)
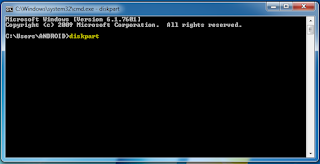
You will need to use the diskpart utility, which is a tool that comes built into Windows, though you’ll need to use the command line to make use of it.
Step 1: Open cmd.exe from the list of installed applications.
You'll be asked to provide administrator permissions, and a new prompt window will appear. The following commands should be run in the new window.
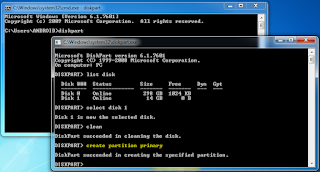
Step 3: Run list disk and hit ENTER. to list the available drives. Take note of the Number ID that identifies the drive you want to recover. In my case, "Drive 1" is the attached 14gb USB Flash Drive that I want to recover.
Step 5: Then, run clean and hit ENTER.This command will completely clean your drive by erasing any existing file system.
Step 6: You can add a partition back to it and format it, so that it acts like a normal storage device. so run create partition primary and hit ENTER.
Step 8: Finally, in the last step type the following command type format quick and hit ENTER button.
Once successfully formatted, you should be able to use your USB drive or SD card again.
VIDEO TUTORIAL - INSTALLATION GUIDE
DOWNLOAD FILES
Click on below button to start Download the files from the download links.
We hope you enjoy my Website content as much as we enjoy offering them to you. If you have any questions or comments, please don't hesitate to let comment below.
Click on below button to start Download the files from the download links.
No- File-Required
DISCLAIMER
All videos on my Website and YouTube channel are for Educational purpose only to help people Fix errors and download and install software... for free. Anyone using these videos for any illegal or unlawful purpose will be solely responsible for his/her activity.
All videos on my Website and YouTube channel are for Educational purpose only to help people Fix errors and download and install software... for free. Anyone using these videos for any illegal or unlawful purpose will be solely responsible for his/her activity.


0 Comments: