


Phoenix OS is an excellent choice if you want to run an Android OS for PC. Find out system requirements and how to install Phoenix OS with this easy guide.
Let’s have a look at how to Install Phoenix OS in Dual Boot Mode with Windows. Do you want to create an Android computer? Phoenix OS, based on the Android x64 project, you can install Android on a laptop or desktop.
Phoenix OS is fully compatible with the Android ecosystem and supports all Android apps and games. On the other hand, it comes with some pre-installed apps like Stardust Browser and WPS Office. Moreover, you can also download applications from Google Play Store, Aptoide, Mobogenie, or F-Droid.
Phoenix OS also includes improvements to Android, such as automatically preventing apps from running in the background. In addition to speed, the OS also receives regular updates. These features have contributed to its recent increase in popularity.
Below given tutorial will assist you to Download Phoenix OS for Windows 7, 8, 8.1, 10 PC with detailed instructions. Phoenix OS is an Android-based operating system, especially for Windows and Mac. Furthermore, it looks and feels a lot like the famous Remix OS but has many advantages over it.
PHOENIX OS HARDWARE REQUIREMENTS


Operating System: Windows 7, 8, 8.1, 10 or Vista.
Free Disk Space: 35GB
Intel or AMD processor made around 2012 or later, preferably an Intel Atom processor.
DOWNLOAD PHOENIX OS IINSTALLER
Here we aren’t using a regular ISO image of this Phoenix OS flashed on a USB disk, rather than an executable file of its which is meant for Windows platforms and work exactly like all other Windows software.
Download Phoenix OS Installer (PhoenixOSInstaller) from official PhoenixOS download page Download Phoenix OS, click on the Download button (google drive link or Mega) given in the front of Exe Installer (For windows). While performing this tutorial, the latest version of Android available on this PC Android OS was 7.1, which may be different in yours.
The file-based on Android 7.1 is a 64-bit one.
So if your is system is 32-bit then go for PhoenixOS base on Android 5.1, available on the same page.
CREATE A PARTITION FOR PHOENIX OS

Step 2: Manage -> Disk Management.

Step 3: Right Click The Drive Which Drives Free More Than 35 Gb, Then Click Shrink Volume.

Step 4: Enter The Amount Of You Want In New Drive Create 16 - 35 GB Then Click Shrink Wait For It Done.

Step 5: New Unallocated Space Will Show Right Click On It Then Create New Simple Volume.

Step 6: Select Size And Click Next.

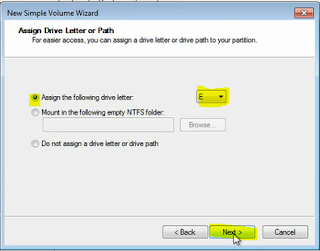
Step 7: Choose Assign the following drive letter and select a letter then click on Next.
To confirm the same, go to My Computer and verify it.

INSTALL ANDROID PHOENIX OS DUAL BOOT WITH WINDOWS OS

Step 3: Select the Drive or partition to install Android Phoenix OS, I am installing it on E partition which was previously created.

Note: Phoenix OS will install in a folder created by its own name in E partition and will not delete or format your existing partition.
Step 4: After selecting the partition, click on the Next button.

Step 5: Select Data size for Phoenix OS installation and then click the install button.

Step 6: Installation Progress, Wait for a few minutes to complete the installation.

Step 7: After the installation is completed successfully, Save your current work and then click OK option.

Step 8: The next step Double click on Start Phoenix OS.

WINDOWS OS AND PHOENIX DUAL BOOT MENU

Step 2: Welcome to Phoenix OS, By default, the OS comes in Chinese language and I am sure you are not familiar with it, thus click on the drop-down box and select the English language.

Step 3: Read the agreement, if you want and click on the Accept button to accord with all given terms and conditions.

Step 4: To receive security updates and for the installation of apps, connect to existing WiFi connection of yours, however, you can do it later from the OS interface as well.

Step 5: Type a Phoenix OS account name and then click finish.

After finishing the setup, This is how you can install Phoenix OS on your Windows PC.To go back to Windows OS, just restart your PC and select Windows from the boot menu options.

Finally! This is how you can install Phoenix OS on your Windows PC. This is an official way to install Android on a PC. Moreover, with this OS, you can perform all the tasks like Android devices especially play PUBG Mobile games without lag. If you have any questions, problems, or suggestions related to this tutorial, then feel free to comment below.
Step 1: Open Disk Management By Right Click Computer -> Manage.
Step 3: Right Click The Drive Which Drives Free More Than 35 Gb, Then Click Shrink Volume.
Step 4: Enter The Amount Of You Want In New Drive Create 16 - 35 GB Then Click Shrink Wait For It Done.
Step 5: New Unallocated Space Will Show Right Click On It Then Create New Simple Volume.
Step 6: Select Size And Click Next.
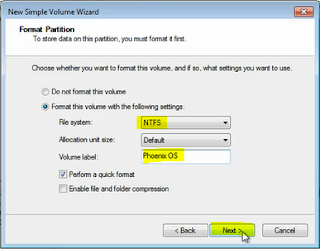
Step 8: Change The File System To FAT32 or NFTS and Change The Lable Name to PhoenixOS Then Next And Finish.
INSTALL ANDROID PHOENIX OS DUAL BOOT WITH WINDOWS OS
After successfully creating a new partition, let’s install Phoenix OS on your Windows PC.
Step 1: After downloading Phoenix OS, doubt click to run the PhoenixOS.exe Installer file.
Step 1: After downloading Phoenix OS, doubt click to run the PhoenixOS.exe Installer file.
Step 2: Click the Install button to install Phoenix OS on Windows.
Step 3: Select the Drive or partition to install Android Phoenix OS, I am installing it on E partition which was previously created.
Step 4: After selecting the partition, click on the Next button.
Step 5: Select Data size for Phoenix OS installation and then click the install button.
Step 6: Installation Progress, Wait for a few minutes to complete the installation.
Step 7: After the installation is completed successfully, Save your current work and then click OK option.
WINDOWS OS AND PHOENIX DUAL BOOT MENU
When you reboot your system, Windows OS boot manager menu will appear, which also will feature an option for Phoenix OS, click on it so that we can boot our newly install Phoenix OS operating system.
Step 1: Phoenix OS Screen comes up.
Step 1: Phoenix OS Screen comes up.
Step 2: Welcome to Phoenix OS, By default, the OS comes in Chinese language and I am sure you are not familiar with it, thus click on the drop-down box and select the English language.
Step 3: Read the agreement, if you want and click on the Accept button to accord with all given terms and conditions.
Step 4: To receive security updates and for the installation of apps, connect to existing WiFi connection of yours, however, you can do it later from the OS interface as well.
Step 5: Type a Phoenix OS account name and then click finish.
After finishing the setup, This is how you can install Phoenix OS on your Windows PC.To go back to Windows OS, just restart your PC and select Windows from the boot menu options.
Finally! This is how you can install Phoenix OS on your Windows PC. This is an official way to install Android on a PC. Moreover, with this OS, you can perform all the tasks like Android devices especially play PUBG Mobile games without lag. If you have any questions, problems, or suggestions related to this tutorial, then feel free to comment below.
VIDEO TUTORIAL - INSTALLATION GUIDE
DOWNLOAD FILES
Click on below button to start Download the files from the download links.

We hope you enjoy my Website content as much as we enjoy offering them to you. If you have any questions or comments, please don't hesitate to let comment below.
Click on below button to start Download the files from the download links.
PhoenixOSInstaller-v3.6.1.564-x64
DISCLAIMER
All videos on my Website and YouTube channel are for Educational purpose only to help people Fix errors and download and install software... for free. Anyone using these videos for any illegal or unlawful purpose will be solely responsible for his/her activity.
All videos on my Website and YouTube channel are for Educational purpose only to help people Fix errors and download and install software... for free. Anyone using these videos for any illegal or unlawful purpose will be solely responsible for his/her activity.


0 Comments: