With Ventoy, you don’t need to format the USB drive for each new installation, you just need to copy the ISO file to the USB drive and boot it.
In this tutorial we will explains how to create a multiboot USB in Windows in which you just need to copy any ISO you want to boot. After reading this tutorial you’ll know how to create within a minute a multiboot USB containing multiple operating systems such as different Linux distributions or Microsoft Windows.
You install this tool to a USB drive, then simply copy some ISO files to the USB drive, and you can boot from it with no other changes (so without having to reformat the USB drive every time you want to create a bootable USB drive, and without having to extract the ISO file contents). You can also continue using the USB stick for other things, and it will continue to work as a bootable USB. The application is available for Microsoft Windows and Linux.
Ventoy is an open source tool for creating bootable USB drives. It can be used to create a bootable and permanent drive that can even contain more than one distribution at a time. The USB drive does not need to be formatted and you can copy as many ISO files as you want. Ventoy will give you a boot menu to select them.
In addition, Ventoy provides Legacy and UEFI Secure Boot support, supports ISO files larger than 4GB, and can be updated without reformatting the USB device.
DOWNLOADING VENTOY MULTIBOOT USB
Download Ventoy Zip file to your computer. To download the latest Ventoy file to your computer, head over to the official website.
Download Ventoy Zip file to your computer. To download the latest Ventoy file to your computer, head over to the official website.
Then you will go to this Github page.
Step 1: Open and unzip the downloaded file.
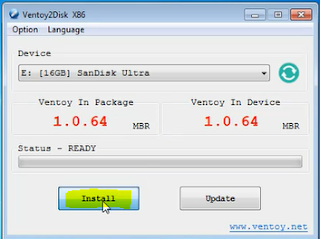
Step 3: You need to connect your USB stick to your computer. If it’s not showing up in the device box, click the Refresh button.
Step 4: So be aware that this will wipe any existing data on the flash drive. Make sure you don’t have any important data in it and click Install Button.
Step 6: The app will open another Warning window confirming if you want to reformat the drive. Click on Yes.
Step 7: That’s it. We’ve successfully set up our USB stick. Click on the OK button to close the message. You can also close the application by clicking the Close button on the title bar.
Step 8: If you open up File manager you can see that the USB stick now shows up as Ventoy.
Step 9: Open File Explorer and head to the directory where you keep your boot images.
Step 11: Now your Ventoy bootable USB drive is ready to use. Boot your system with newly created bootable USB drive. The images will then be listed on your boot menu and you will choose the one that you wish to use.
VIDEO TUTORIAL - INSTALLATION GUIDE
DOWNLOAD FILES
Click on below button to start Download the files from the download links.
ventoy-1.0.64-windows.zip
We hope you enjoy my Website content as much as we enjoy offering them to you. If you have any questions or comments, please don't hesitate to let comment below.
DISCLAIMER
All videos on my Website and YouTube channel are for Educational purpose only to help people Fix errors and download and install software... for free. Anyone using these videos for any illegal or unlawful purpose will be solely responsible for his/her activity.


0 Comments: