Deepin is a Chinese Linux distribution based on the stable release of Debian. Earlier versions before version 15 were based on Ubuntu until that changed. A unique feature with this Linux distro is the clean graphical user interface. For Windows users who want to migrate to Linux systems, Deepin Linux will give you a nearly similar user experience as the Windows User interface.
DeepIn Linux is an interesting Linux distro developed in China. The DeepIn Desktop Environment is Windows like and is currently optimised for Desktop use.
Deepin is a user-friendly Debian based Linux distribution. It is a free and open source operating system mostly used at desktop level. Recently stable version of Deepin 20.3 has been released. Deepin 20.3 comes with stable kernel version 15
There are a few annoyances for an international user because DeepIn is optimised for the Chinese market such as the browser using a Chinese search engine, the DeepIn Store Servers being based in China making it slow to install software and the user reviews are not automatically translated into your language of choice. Also the DeepIn forums are based in China and slow to access making it hard to leave feedback.
Deepin features many high-quality layouts/appearances and great software. If you want a great-looking distribution, read on how to install Deepin.
INSTALLATION REQUIREMENTS
Please ensure that your computer meets the following requirements, otherwise you may not experience deepin perfectly:
CPU: Intel Pentium IV 2GHz or higher
Memory: more than 2G RAM, 4G or higher is recommended
Disk: more than 25 GB free disk space
The Deepin Linux ISO file.
A working USB drive (at least 4GB)
You can Download Deepin OS linux from deepin official website. Click Here to download it.
CREATING A BOOTABLE USB DRIVE OF DEEPIN LINUX
Step 1: Insert the USB flash drive into your computer.
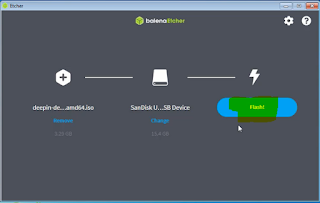
Step 2: Double-click on the balenaEtcher download file to run the app. Press Flash from file to select the downloaded Deepin OS Linux ISO file on your computer.
Step 3: Press Select target and choose the correct USB flash drive from the list.
Step 4: Press Flash! to begin writing Deepin OS Linux to the USB flash drive.
Step 5: Select your language in my case English and then accept the DeepIn OS User Experience Program License Agreement and End User License Agreement and Privacy Policy checkboxes and select Next.
Step 6: Full Disk should be selected by default. Details about the partitions to be created will be displayed then select Next.
Step 7: You will see the Ready to Install screen, which will show you the partition changes you have made, Click Continue.
Step 11: In the next screen you will need to select your Language and accept the License Agreement again then click Next.
Step 14: Input your username, it has to be all lower case characters. A computer name will be generated from your username but you can change it if you wish. Then input a password and confirm your password. Then select Next.
Step 15: The setup will spend some time tuning your system (installing the correct device drivers etc...)
Step 17: You will be presented with an optional introduction video, you can view it if you want. When ready select Next.
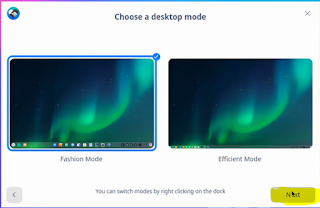
Step 18: You have the option of either Fashion Mode which has a Central Dock (like Mac OS) or Efficient Mode which has a traditional Taskbar (like Windows).
Step 19: The Effect Mode or Fashion Mode. The Effect Mode is recommended if you are installing on a powerful physical computer but the Fashion Mode is recommended if you are installing on lower spec hardware.
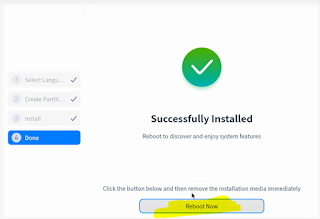
Step 20: You will then be presented with an option of icon themes. Select your Icon theme and select Done. Deepin 20.3 is now installed.
VIDEO TUTORIAL - INSTALLATION GUIDE
DOWNLOAD FILES
Click on below button to start Download the files from the download links.
We hope you enjoy my Website content as much as we enjoy offering them to you. If you have any questions or comments, please don't hesitate to let comment below.
DISCLAIMER
All videos on my Website and YouTube channel are for Educational purpose only to help people Fix errors and download and install software... for free. Anyone using these videos for any illegal or unlawful purpose will be solely responsible for his/her activity.
Related searches
DeepIn Linux is an interesting Linux distro developed in China. The DeepIn Desktop Environment is Windows like and is currently optimised for Desktop use.
Deepin is a user-friendly Debian based Linux distribution. It is a free and open source operating system mostly used at desktop level. Recently stable version of Deepin 20.3 has been released. Deepin 20.3 comes with stable kernel version 15
There are a few annoyances for an international user because DeepIn is optimised for the Chinese market such as the browser using a Chinese search engine, the DeepIn Store Servers being based in China making it slow to install software and the user reviews are not automatically translated into your language of choice. Also the DeepIn forums are based in China and slow to access making it hard to leave feedback.
Deepin features many high-quality layouts/appearances and great software. If you want a great-looking distribution, read on how to install Deepin.
INSTALLATION REQUIREMENTS
Please ensure that your computer meets the following requirements, otherwise you may not experience deepin perfectly:
CPU: Intel Pentium IV 2GHz or higher
Memory: more than 2G RAM, 4G or higher is recommended
Disk: more than 25 GB free disk space
The Deepin Linux ISO file.
A working USB drive (at least 4GB)
DOWNLOAD DEEPIN OS AND ETCHER TOOL
You can Download Deepin OS linux from deepin official website. Click Here to download it.
To install Deepin OS, you need to write your downloaded ISO to a USB stick to create the installation media. This is not the same as copying the ISO, and requires some bespoke software.
For this tutorial, we’ll use balenaEtcher, as it runs on Linux, Windows and Mac OS. Choose the version that corresponds to your current operating system, download and install the tool.
For this tutorial, we’ll use balenaEtcher, as it runs on Linux, Windows and Mac OS. Choose the version that corresponds to your current operating system, download and install the tool.
CREATING A BOOTABLE USB DRIVE OF DEEPIN LINUX
Step 1: Insert the USB flash drive into your computer.
Step 2: Double-click on the balenaEtcher download file to run the app. Press Flash from file to select the downloaded Deepin OS Linux ISO file on your computer.
Step 3: Press Select target and choose the correct USB flash drive from the list.
After a few minutes, the USB flash drive will be ready for booting into Deepin OS Linux.
INSTALLING DEEPIN LINUX ON WINDOWS PC
We will make easier for you to install Deepin OS 20.3 on your Windows pc, this guide is especially for noob, you can simply do this and it is easy for you, but for noobs here I’m for helping them.
Step 1: While the system would restart and initialize start pressing F9 (or Del or F10 or F12 or Esc) to display Boot Menu. The key could be different on different make and model, try other keys as per Make and Model of your machine.
Step 2: From the Boot Menu, select Flash Drive as Boot Device and Hit Enter. It may be at different serial number in different systems. Wait for the system to Boot from the Flash Drive.
Step 3: Install DeepIn 20.3 with Kernel 5.10 Desktop will be automatically selected and the install will proceed after a 5 s countdown. It is recommended to use this default option.
Step 5: Select your language in my case English and then accept the DeepIn OS User Experience Program License Agreement and End User License Agreement and Privacy Policy checkboxes and select Next.
Step 6: Full Disk should be selected by default. Details about the partitions to be created will be displayed then select Next.
Step 7: You will see the Ready to Install screen, which will show you the partition changes you have made, Click Continue.
Step 11: In the next screen you will need to select your Language and accept the License Agreement again then click Next.
Step 14: Input your username, it has to be all lower case characters. A computer name will be generated from your username but you can change it if you wish. Then input a password and confirm your password. Then select Next.
Step 15: The setup will spend some time tuning your system (installing the correct device drivers etc...)
Step 17: You will be presented with an optional introduction video, you can view it if you want. When ready select Next.
Step 18: You have the option of either Fashion Mode which has a Central Dock (like Mac OS) or Efficient Mode which has a traditional Taskbar (like Windows).
Step 19: The Effect Mode or Fashion Mode. The Effect Mode is recommended if you are installing on a powerful physical computer but the Fashion Mode is recommended if you are installing on lower spec hardware.
Step 20: You will then be presented with an option of icon themes. Select your Icon theme and select Done. Deepin 20.3 is now installed.
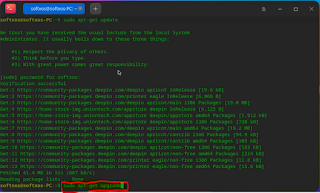
Step 2: Now launch the terminal from the App Menu.
sudo apt-get update
Followed by your password.
Followed by your password.
Step 4: Now try this:
sudo apt-get upgrade
sudo apt-get upgrade
Step 5: You can press y to accept and continue.
VIDEO TUTORIAL - INSTALLATION GUIDE
DOWNLOAD FILES
Click on below button to start Download the files from the download links.
balenaEtcher-Portable-1.5.122
deepin-desktop-community-20.3-amd64.iso
We hope you enjoy my Website content as much as we enjoy offering them to you. If you have any questions or comments, please don't hesitate to let comment below.
DISCLAIMER
All videos on my Website and YouTube channel are for Educational purpose only to help people Fix errors and download and install software... for free. Anyone using these videos for any illegal or unlawful purpose will be solely responsible for his/her activity.


0 Comments: