


Android x86 is an open source project facilitating use of Android OS on a PC. Android is an open source operating system basically designed for Mobile devices. Most of the world’s mobile phones and tablets have Android operating system on their phones. They can download and install Android Apps to use on their mobile phones. There are great variety of Apps, Games, etc. available worldwide on Android App Store. One may sometimes think how wonderful it will be if you can use those Apps on your computer as well. However, using Android Apps on desktop is not as straight forward as it is on Mobile phones. This is so because Android x86 unable to use Android Store. But you can always work around to use Android Apps on your big device or PC i.e. Desktop or Laptop with x86 architecture using APK files and allowing 3rd party Application installation.
As a normal Linux distribution, the project produces ready ISO images that can be launched in Live mode, or installed on the hard drive of the target device. Starting with 4.4-r2, Android-x86 also releases efi_img images that can be used to create a Live USB, which can be downloaded from UEFI devices.
Let us see how to install Android x86 on PC i.e. your Laptop or Desktop Computer using a bootable flash drive with setup files on it. This article describes the process to install latest version Android x86 as a Single Boot Host Operating System on a Computer by creating a bootable Android x86 USB Flash Drive on an existing Windows System while replacing the existing operating system. You can use a Flash Drive of 2 GB or more to make it Android x86 bootable Flash Drive.
DOWNLOAD ANDROID x86 ISO FILE AND RUFUS FLASHING TOOL
Step 1: Login to your Windows System, open a web browser and navigate to download website of Android x86 Operating System and click on “Android-x86 64-bit ISO file”.

Step 2: In the meantime, while the Android x86 ISO file is downloading, navigate to official web site of Rufus to download Rufus flashing Software tool for creating a bootable Flash Drive. Scroll down the page and click on the link to download latest version of Rufus tool under download section. Wait for the download to finish and close the web browser.

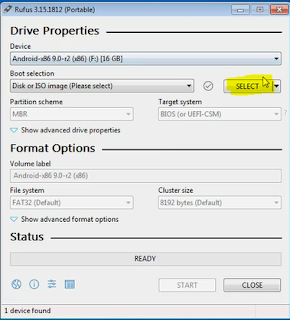
Step 3: Open Rufus tool, Insert a Flash Drive in the USB slot of your computer, Rufus will detect the Flash and display in “Device” dropdown box.

Step 4: Now browse and select the Android x86 ISO file by clicking on Select button. then click on Start.
Step 5: Click Yes to allow Rufus to download additional system files for compatibility with the given ISO file.
Step 6: Click OK and continue with recommended option to “Write in ISO Image mode”. Ensure that there is no important data on the Flash Drive.

Step 7: Click Ok to continue flashing the drive. Wait for the flashing to finish.

Step 8: Click Close when Rufus window display Ready as status to close the Rufus Tool on successful flashing of Flash Drive.

INSTALL ANDROID x86 ON PC
Step 1: On system boot, press a designated key (F10, F12, F2, Del, Esc, F9) to display Boot Menu. It will display the list of booting devices. Select USB Drive as Boot Device and Hit Enter.

Step 2: If you want to use Android-x86 as the only OS in your device, you may choose Advanced options...


Step 4: If you have multiple hard drives, the installer will let you choose which one to use. Be careful to choose the correct one and click OK. Note you can install Android-x86 to an external disk like USB drive.


Step 6: The installation will begin, and you will see the progress bar.


Step 8: Select the first option and if wifi does not work for you choose Android-x86 9.0-r2 (Debug nomodeset).

Step 9: It will take some time to setup android. So just wait for 5 to 10 minutes and don’t turn off your pc.

Step 10: After this, you will see the android installation menu. First, Select your Language and click on Start.

Step 11: Next, you will see Connect WiFi option, You can skip this if you want.

Step 12: Click on Continue.

Step 13: After this, you have to configure Date and Time and click on the Next button.

Step 14: Next, you will see Google Services Settings. click on more button then on the Agree button.

Step 15: Protect your PC with a password or click on Not now.

Step 16: After this, you will finally see the home page of android.

VIDEO TUTORIAL - INSTALLATION GUIDE
DOWNLOAD FILES
Click on below button to start Download the files from the download links.

We hope you enjoy my Website content as much as we enjoy offering them to you. If you have any questions or comments, please don't hesitate to let comment below.
Click on below button to start Download the files from the download links.
rufus-3.15p
android-x86_64-9.0-r2.iso
DISCLAIMER
All videos on my Website and YouTube channel are for Educational purpose only to help people Fix errors and download and install software... for free. Anyone using these videos for any illegal or unlawful purpose will be solely responsible for his/her activity.
All videos on my Website and YouTube channel are for Educational purpose only to help people Fix errors and download and install software... for free. Anyone using these videos for any illegal or unlawful purpose will be solely responsible for his/her activity.


0 Comments: