


As you know, openSUSE comes with two Version openSUSE Tumbleweed and openSUSE Leap. In this article, we will learn how to install openSUSE Tumbleweed.
Today I will take advantage with you to share this installation guide from openSUSE, to be specific your Tumbleweed version. This version, compared to the others offered by openSUSE, is a Rolling Release version.
OpenSUSE Tumbleweed is a community Linux distribution sponsored by SUSE. It is a rolling distribution, like Arch, that continuously receives the latest packages from the openSUSE community, SUSE, and upstream open source projects.
For those who do not know this model, I will tell you a little, the rolling reread this is always in continuous development Regarding a software system in constant development, we will always have the most recent but stable.
No more we will start with the installation processThere are many people who think that the system is intended for advanced users, when it is not, for those who are new to Linux they just have to do their part and be patient.
PREREQUISITES
- 2 GHz Dual-core processor or higher
- Minimum 2GB RAM
- 40 GB Free Disk space
- Downloaded openSUSE ISO File
- BalenaEtcher
- USB drive
- Internet connection
DOWNLOAD AN OPENSUSE TUMBLEWeed IMAGE AND ETCHER TOOL
You can Download OpenSUSE Tumbleweed from their Official site. Click Here to visit their Official Site.
In my case, I’ll download (x86_64) opensuse Offline Image, by making click on Offline Image.

To install openSUSE TumbleWeed, you need to write your downloaded ISO to a USB stick to create the installation media. This is not the same as copying the ISO, and requires some bespoke software.
For this tutorial, we’ll use balenaEtcher, as it runs on Linux, Windows and Mac OS. Choose the version that corresponds to your current operating system, download and install the tool.

CREATE A BOOTABLE USB STICK
Step 1: Insert the USB flash drive into your computer.
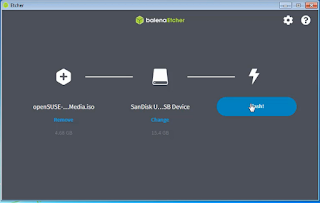
Step 2: Double-click on the balenaEtcher download file to run the app. Press Flash from file to select the downloaded openSUSE TumbleWeed ISO file on your computer.

Step 3: Press Select target and choose the correct USB flash drive from the list.

INSTALLATION OPENSUSE TUMBlEWEED
Step 1: Insert the USB flash drive into your computer.
Step 2: Restart System to access Boot Menu, This is the step where the system will get the boot from USB drive, In some case system automatically gets the boot from USB if you have given preference to Boot from USB else you need to do manually, When the system gets to boot press the ESC or F2 or F9 or F12 to access the boot menu options button may different as per the manufacturer.

Step 3: Once the system gets the boot from the USB drive, you will be able to see multiple boot options from that select the Installation and press the enter key to proceed Installation part.


Step 5: Language, Keyboard and License Agreement, to change the default Language, you should click on the Language drop-down menu and select the relevant language. On the left, you are allowed to choose a different Keyboard layout. For me default options is good to go so I’ll simply click on Next Button.

Step 6: Online Repositories, If you already attached an Ethernet cable with an active Internet connection network configuration step will get skipped, and it will ask you, Activate online repositories now? It’s up to you whether you want to activate or not, But I advise you to click on Yes. This will install additional software, which is necessary while using the system not only that, it will also get the latest security patches.

Step 7: It will move to the next screen, Overthere you will see a list of Additional Online Repositories. By default top 3 Checkboxes will be checked, So you just make sure that Checkboxes are checked and click on Next to proceed further.

Step 8: System Role, This isn’t interesting that we are allowed to choose a Desktop environment as per our preference, Once you have decided what type of Desktop Environment is going to use, click on Next.
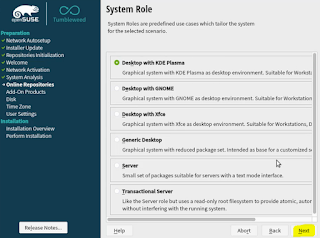
List of Desktop Environment available to use such as:
- Desktop with KDE Plasma (Prefer to use it is close to the Windows experience).
- Desktop with GNOME (It is also one of the best Desktop environment).
- Generic Desktop (In the next screen you will choose between XFCE, LXDE, MATE, and others).
- Server (Command Line Based No GUI).
- Transactional Server (Read-only root system) no write permission is allowed.
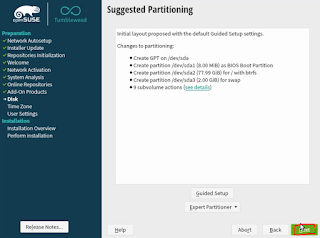
Step 9: Suggested Partitioning, If free space is available to your Hard drive, YAST2 Installer will create a GUIDED SPACE with a btrfs file system, after that click on Next.
Step 10: Clock and Time Zone, you can update the region and timezone through the drop-down menu. First, change the region afterward, change the timezone, then click Next.

Step 11: Create Local User, This is the step where you need to create a local user. To create a user, you need to fill in those options like User’s Full Name, Username, Password and Confirm password, For security purpose unchecked the Automatic Login to disable automatic login as a system get started and click on Next.

Step 12: Installation Settings, Please check once everything as per your intends If you want to make any changes click on Heading and make a change afterward, you will not be able to make any modifications, then click Next.

Step 13: This is the final confirmation, If you are sure about your preference, click on Install after this system will get start installing on the Hard drive, and If you feel that something is missing, please click on Back and make a correction.

Step 15: Reboot, When the installation is completed system will automatically get booted.

Step 16: We can log in to our openSUSE Tumbleweed KDE Plasma Desktop environment and use it as a daily driver.

UPDATE AND UPGRADE WITH OPENSUSE TUMBLEWEED
After installing any Linux system, it’s always a good idea to run an update to make sure that you’re rocking with all the latest stable packages. It’s just a matter of running a couple of lines of commands in the terminal and there’s very few chance of breaking down things. Let’s get started!
Fire up the terminal by pressing Ctrl + Alt + T and run the following command.
sudo zypper ref
Fire up the terminal by pressing Ctrl + Alt + T and run the following command.
sudo zypper ref

sudo zypper up

To continue press Y and Enter.

sudo zypper dup

VIDEO TUTORIAL - INSTALLATION GUIDE
DOWNLOAD FILES
Click on below button to start Download the files from the download links.

balenaEtcher-Portable-1.5.122
openSUSE-Tumbleweed-DVD-x86_64-Snapshot20211215-Media.iso
We hope you enjoy my Website content as much as we enjoy offering them to you. If you have any questions or comments, please don't hesitate to let comment below.
DISCLAIMER
All videos on my Website and YouTube channel are for Educational purpose only to help people Fix errors and download and install software... for free. Anyone using these videos for any illegal or unlawful purpose will be solely responsible for his/her activity.


0 Comments: