


Kali Linux is the most popular OS used by Cyber Security experts all over the world. If you want to get into the world of Cyber Security and Ethical Hacking, learning how to install Kali Linux is the first step. You can go through this Cybersecurity video lecture where you can find our Training expert is discussing each & every nitty-gritty of the technology.
Kali Linux is a secure Debian-based Linux distribution that comes pre-loaded with hundreds of well-known security tools and has gained quite a name for itself.
Kali Linux Installation is a simple and stress-free process. We will first need to check if our computer has compatible hardware. Platforms such as amd64, i386, and ARM support Kali Linux. The i386 images can be run on systems with more than 4GB RAM.
The focus of this guide and future articles is to help individuals become more familiar with Kali Linux and several of the tools available within the distribution.
Before you begin, back up and save all the important data on the PC where you’ll install Kali Linux. Single-boot installs like that described here will wipe the entire hard drive, and while there are options to install Kali using only unused disk space, errors can happen. Better safe than sorry.
INSTALLATION REQUIREMENTS
- Minimum 20 GB of free space in your hard drive is recommended.
- At least 4 GB of ram is recommended.
- USB Flash Drive
DOWNLOAD KALI LINUX AND ETCHER TOOL
You need an ISO image of Kali Linux. You can Download it from the Official Kali Linux download page. You also need a 16GB USB drive which will be used as a bootable installation medium.

To install Kali Linux, you need to write your downloaded ISO to a USB stick to create the installation media. This is not the same as copying the ISO, and requires some bespoke software.
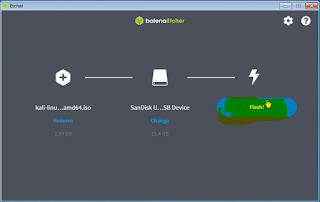
For this tutorial, we’ll use balenaEtcher, as it runs on Linux, Windows and Mac OS. Choose the version that corresponds to your current operating system, download and install the tool.

CREATE A BOOTABLE USB STICK
Step 1: Insert the USB flash drive into your computer.
Step 2: Double-click on the balenaEtcher download file to run the app. Press Flash from file to select the downloaded Kali ISO file on your computer.

Step 3: Press Select target and choose the correct USB flash drive from the list.

Step 4: Press Flash! to begin writing Kali Linux to the USB flash drive.
For this tutorial, we’ll use balenaEtcher, as it runs on Linux, Windows and Mac OS. Choose the version that corresponds to your current operating system, download and install the tool.
CREATE A BOOTABLE USB STICK
Step 2: Double-click on the balenaEtcher download file to run the app. Press Flash from file to select the downloaded Kali ISO file on your computer.
Step 4: Press Flash! to begin writing Kali Linux to the USB flash drive.
After a few minutes, the USB flash drive will be ready for booting into Kali Linux.
Step 1: Insert the USB flash drive into your computer.
Step 2: While the system would restart and initialize start pressing F9 (or Del or F10 or F12 or Esc) to display Boot Menu. The key could be different on different make and model, try other keys as per Make and Model of your machine.
Step 3: From the Boot Menu, select Flash Drive as Boot Device and Hit Enter. It may be at different serial number in different systems. Wait for the system to Boot from the Flash Drive.

Step 4: Once the machine is powered up, you will be prompted to select your preferred installation mode in the GRUB menu. Select graphical install to continue.
Step 2: While the system would restart and initialize start pressing F9 (or Del or F10 or F12 or Esc) to display Boot Menu. The key could be different on different make and model, try other keys as per Make and Model of your machine.
Step 3: From the Boot Menu, select Flash Drive as Boot Device and Hit Enter. It may be at different serial number in different systems. Wait for the system to Boot from the Flash Drive.

Step 5: Next screen will ask you to select your preferred language, then press Continue.

Step 6: Select a country for the correct timezone to be set for your machine during installation, then press Continue.

Step 7: Configure Keyboard keymap and press Continue.

Step 8: Wait for the installation components to be loaded.

Step 9: Once through the local information, the loader will automatically install some additional components and configure your network related settings. Then the installer will prompt for a hostname and domain for this installation. Provide appropriate information for the environment and continue installing.


Step 10: Set full name for new user and click Continue.

Step 11: Create a username for your account, then click Continue.


Step 13: Wait for the installation components to be loaded.


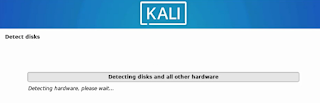
Step 15: Wait to detect your pc disks.

Step 17: Select your disk for installation and press Continue.

Step 18: Select All files in one partition (recommended for new users) and then hit on Continue.

Step 19: Confirm all changes to be made to the disk. Be aware that if you continue it will ERASE DATA ON THE DISK, then press Continue.

Step 20: Commit changes to disk by choosing Yes and Continue.

Step 21: On you confirm the partition changes, the installer will run through the process of installing the files. Let it install the system automatically, this may take a while…

Step 22: Once the necessary files are installed, system will ask you if you want to set up a network mirror to obtain future pieces of software and updates. Be sure to enable this functionality if you wish to use the Kali repositories.
Step 23: Choose software applications and Kali desktop environment to install. then press Continue.

Step 24: Next you will be asked to install the GRUB boot loader. Select Yes and pick the device to write the necessary boot loader information to the hard drive which is required to boot Kali. then press Continue.

Step 25: Select target disk for GRUB installation Mostly the first disk and click Continue.

Step 26: Once the installer finishes installing GRUB to the disk, click on Continue to finish the installation, it will install some final stage files.

Step 27: In this screen press Enter on wait for 5 seconds, it will likely default boot into it.

Step 28: Once it booted, log in as the user softxos with the password created earlier in the installation process.

Now that we have accomplished installing Kali Linux, it is time to sit back and enjoy our new distribution!

WHAT TO DO AFTER INSTALLING KALI LINUX
Update Kali Linux using command line in the Terminal
All you have to do is to fire up the terminal emulator app or another terminal emulator of your choice.
Update Kali Linux using command line in the Terminal
All you have to do is to fire up the terminal emulator app or another terminal emulator of your choice.

let’s try and update the system using:
sudo apt-get update
Followed by your password.
sudo apt-get update
Followed by your password.

Now try this:
sudo apt-get upgrade
sudo apt-get upgrade

Pay attention to the progress of the Terminal and enter Y when needed.

In some cases, you may need to reboot your Ubuntu system for the installed updates to work properly.
VIDEO TUTORIAL - INSTALLATION GUIDE
DOWNLOAD FILES
Click on below button to start Download the files from the download links.

balenaEtcher-Portable-1.5.122
kali-linux-2022.1-installer-amd64.iso
We hope you enjoy my Website content as much as we enjoy offering them to you. If you have any questions or comments, please don't hesitate to let comment below.
DISCLAIMER
All videos on my Website and YouTube channel are for Educational purpose only to help people Fix errors and download and install software... for free. Anyone using these videos for any illegal or unlawful purpose will be solely responsible for his/her activity.


0 Comments: